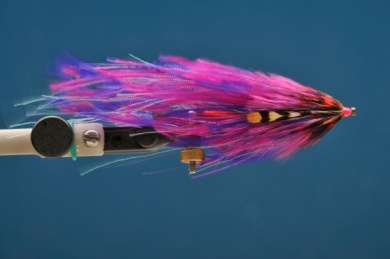
Shuri Shumakov was a key character on reviving the popularity of tube flies. His short patterns, with cone heads, soon lead the way to countless variants, combining plastic tubes with metallic pieces to achieve highly noticeable effects on flies.Shumakov, sadly gone too young, used to combine cones View more...Shuri Shumakov was a key character on reviving the popularity of tube flies. His short patterns, with cone heads, soon lead the way to countless variants, combining plastic tubes with metallic pieces to achieve highly noticeable effects on flies.Shumakov, sadly gone too young, used to combine cones and metallic tubes, tying flies in sections like the Fuzzy Wuzzy pattern, a style that proved to be practical and effective for salmon tube flies in Russia and Iceland. In another corner of the world, where steelhead reign, the Intruder flies tied on shortened hooks or Waddington Partridge hooks are very good for these fish and salmon too, especially King salmon. Combining Shumakov’s tying style, placing cones in a tube, and using long Intruder filaments makes enduring and highly effective flies for waters that run high.Many original Intruders use polar bear hair, heron filaments, rare pheasant or Lady Amherst pheasant tail fibers dyed in different colors. These materials are not easy to get, so I decided to use dyed ostrich feathers, easily obtained and with great underwater movement, even better than the original material. It is simple to paint with permanent marker, and good barred details are really attractive to fish.
Move the mouse over the image to zoom in the fly.
Touch the image to zoom in the fly.

List of materials
Tying MaterialsMetallic Tube: fluorescent Eumer tuve, with a fixed head on one tip. We can use several models as long as these are short, its shape will not alter the way the fly works. Choose a bright color if you are fishing high, cold and rough waters.Plastic Tube: it must fit in the metallic tube. Eumer makes plastic tube kits which include several lengths and colors; these are practical and not expensive.Cones: those especially made to thread in the plastic tube. The central hole is much bi View more...Tying MaterialsMetallic Tube: fluorescent Eumer tuve, with a fixed head on one tip. We can use several models as long as these are short, its shape will not alter the way the fly works. Choose a bright color if you are fishing high, cold and rough waters.Plastic Tube: it must fit in the metallic tube. Eumer makes plastic tube kits which include several lengths and colors; these are practical and not expensive.Cones: those especially made to thread in the plastic tube. The central hole is much bigger than in regular cones that do not fit the plastic tube.Flash: pearled Krystal Flash and purple holographic Flashabou.Long Collar: magenta ostrich fibers, barred.Short Collars: dyed rooster neck hackles. Soft and with long fibers. In pink and purple colors.Final Collar: Guinea hen, fluorescent orange color.Cheek: Jungle Cock.
Steps
Step 1
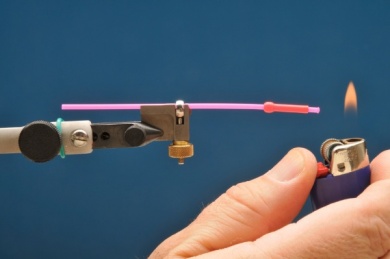
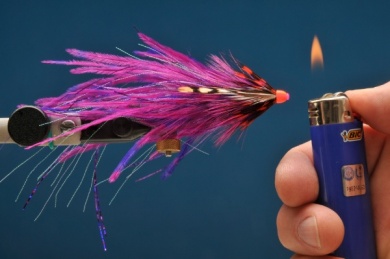
Place the fluorescent plastic tube inside the metallic one (I use a fixed-head Eumer) and heat the tip with the blue flame of a lighter to make a small top that will avoid the fly from disassembling.
Step 2
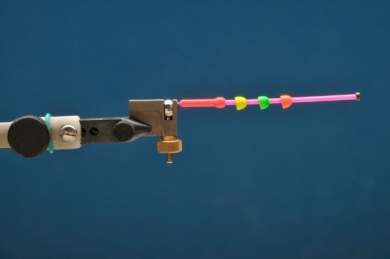
Before placing everything on the tube holder, thread three fluorescent cones. Then, cut the plastic tube, long enough to make a four-body fly. Long tubes are easier to work with, we can cut them when we finish; but we would have to cut and ruin the fly if we used a tube that was too short. The metallic tube is three and a half times the length of the plastic ones, and it is a good thing to use it as reference. View more...Before placing everything on the tube holder, thread three fluorescent cones. Then, cut the plastic tube, long enough to make a four-body fly. Long tubes are easier to work with, we can cut them when we finish; but we would have to cut and ruin the fly if we used a tube that was too short. The metallic tube is three and a half times the length of the plastic ones, and it is a good thing to use it as reference.
Step 3
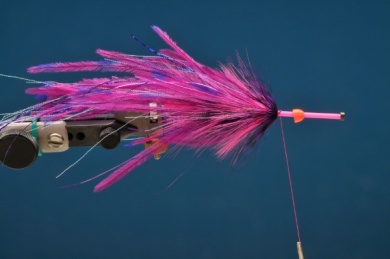
Place the thread before the metallic body and distribute around 12 ostrich fibers covering the perimeter of the plastic tube. Then, use pearled Krystal Flash and purple holographic Flashabou, not too many. Krystal Flash and Flashabou can be replaced with similar materials or with Ice Wing.
Step 4
Tie a pink hackle and a purple one at the front, combing the fibers to the back as if it were a streamer collar. The length of the fibers is not critical, but these should not be too short. Once the purple collar is finished, tie and cut the thread to bring the first cone in. Put some cyanocrilate at the knot first so it remains steady. Apart from adding some weight, the cone protects the knot, and makes the fly longer lasting. View more...Tie a pink hackle and a purple one at the front, combing the fibers to the back as if it were a streamer collar. The length of the fibers is not critical, but these should not be too short. Once the purple collar is finished, tie and cut the thread to bring the first cone in. Put some cyanocrilate at the knot first so it remains steady. Apart from adding some weight, the cone protects the knot, and makes the fly longer lasting.
Step 5
Repeat steps 3 and 4 twice. We will have three parts of the fly. Each time you finish a section, tie the thread and place the cone.
Step 6
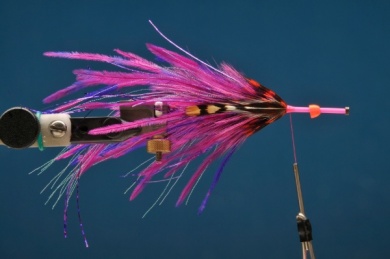
Before the last cone, tie another section; the fourth one. Then make a Guinea hen collar and the Jungle Cock cheeks (these can be made with substitute feathers painted by us).
Step 7
Cut the part of the tube that you did not use leaving a couple of millimeters at the front. Make a new top with the lighter’s blue flame. You can practice this with another tube to see how long it takes to make the top. Be careful not to make a big top as the hole may get covered. A small top is enough and more elegant.
Step 8
One way of adding a PVC flexible tube to lock the hook, that is tied to the leader. The length of this tube is variable and allows us to try different positions of the hook (in this case an Owner Wacky, that points upwards due to its shape). Octopus-like hooks are also great for this kind of fly.